Materials
- 18cm tall polystyrene foam cone
- double sided tape
- green tissue paper (I used nine A4 pieces with each sheet cut equally into six approximate squares)
- chocolates (eg. ferrero rocher, heart shaped chocolates, any kind of foil wrapped chocolate)
- toothpicks
- a square box for the base, with a lid (I used an 8 x 8 x 8 cm gold box from my local cheap store)
- Glitter for the star (eg. gold or silver)
- hot glue gun
- PVC glue
- Card and a heart-shaped punch (optional) for attaching flat-backed heart chocolates
Take a square of tissue paper, place a rounded object in the middle (eg. a thick texta end, or mascara bottle like I used), and scrunch the tissue paper down over it as shown below. Then pinch it and squash it at the middle to form a flattened area to stick a square of double sided tape to.
 Peel the backing off the tape and stick the tissue paper to the cone at the lower edge. Continue doing this, working your way from the bottom upwards and ensuring there is not any obvious gaps through which you can see the white of the cone through. Right at the top, you might need to cut some of the squares a bit smaller to make the tree more shapely.
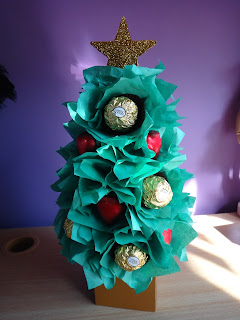
Now it's time to add the chocolates! Start with one kind of chocolate then fill the gaps with the other kind. With round chocolates, like the ferrero rochers I used, insert one end of a toothpick into the back of the chocolate and then gently push the other end of the toothpick into the cone in the middle of a tissue paper square so that one piece of tissue paper directly surrounds the chocolate.
Continue to add the first kind of chocolate at random until they are spread around the whole tree with enough gaps for the second chocolates.
 With flat backed chocolates or chocolates that cannot have a toothpick inserted into them, cut one of the tips off of a toothpick, and hot glue gun this to a small heart shape cutout of card that fits the back of the chocolate. Then hot glue the heart and toothpick to the back of the chocolate, being careful not to press too hard as the heat will melt the chocolate slightly and you do not want to cause the chocolate to melt out of shape by excess pressure.
Gently insert the other, pointed, end of the toothpick into the tree as with the other chocolates. Place the second kind of chocolates evenly throughout the first kind so that there is a random appearance of chocolates all over the tree.
Remove the lid from the box, and using double sided tape, stick the bottom of the box to the base of the cone.
The lid of the box can be used to make the star. Cut a star shape out of the card, and cover completely with PVC glue or a similar alternative. Sprinkle glitter over the star and allow to dry before shaking off the excess. Insert a toothpick into the star (if the card is thick enough, if not, stick two pieces of card together with the toothpick in the middle, or stick the toothpick to the back of the star), and then insert this into the top of the cone.
And that's it! You have a lovely christmas tree chocolate bouquet that makes a perfect gift for anyone!
If you try it out yourself, send me a link!
Merry Christmas! :)


